
Congratulations, and thank you for purchasing a power steering conversion kit from Zpowersteering.com. As Z enthusiasts, we’re super-excited to help our fellow Z owners get the full enjoyment out of their Z for many, many years to come.
Installation of the kit is relatively simple, but you’ll want to set aside some time to do it – For someone who isn’t mechanically-gifted, I’d estimate 4-6 hours.
Ready to get started?
You’ll want a helper handy – Friend, spouse, kids – no matter – They’ll be needed a couple times to lend an extra hand during the swap.
NOTE: As we’re continually improving upon our design, and suppliers make cosmetic changes to components, some of the pics and instructions may no longer be applicable. Rather than try and redo the entire installation instructions, one of our customers did a FANTASTIC job of documenting his install. Give it a watch and you’ll see, he’s FAR better in front of a camera than I am!
1) Disconnect the battery, remove the horn pad and shaft nut and disconnect the horn ground wire. Pull the steering wheel off the shaft. NOTE: sometimes, this requires penetrating oil, a helper to whack the backside of the steering wheel at 3 and 9 o’clock while you pull, or a steering wheel puller (Harbor Freight has them, or you can rent one from a local auto parts store). Leave the wheel nut threaded on a couple threads, so you don’t whack yourself in the face with the steering wheel – OUCH!
2) Remove the plastic clamshell from the steering column – there are philips-head screws in the bottom that secure it around the column. Be gentle, this is 50-year-old plastic.
3) Unplug the turn signal switch and light switch, as well as the ignition switch. These three plastic plugs are pretty easy to see – You may have to work at them a bit, they’ve been living together for 50 years! NOTE: Upon reinstallation, smear some dielectric grease on the mating surfaces of the plugs. Next time you have to unplug them, it’ll be simple.
4) Remove the turn signal, light switch, and ignition switch from the column. This part is pretty self-explanatory. If you’ve never removed an ignition switch, you’ll notice two of the screws have smooth heads – Well, how the HECK do I get them out? Here’s a great tutorial – it’s simple: Removing Ignition Switch Screws.
5) Under the dash, there are 2 (or 4, depending on the year of your Z) bolts holding the column to the bottom of the dashboard. Loosen them, but don’t take them all the way out yet.
6) At the firewall, there are 4 bolts in a plate that holds the steering column to the firewall. Remove them as well, and set them aside.
Take a break, and go open the hood again – This is the toughest part of the project, but it goes by quickly.
7) Find the steering coupler – It’s the rubber “biscuit” about 5″ down the steering column from the firewall. Here’s what it looks like: 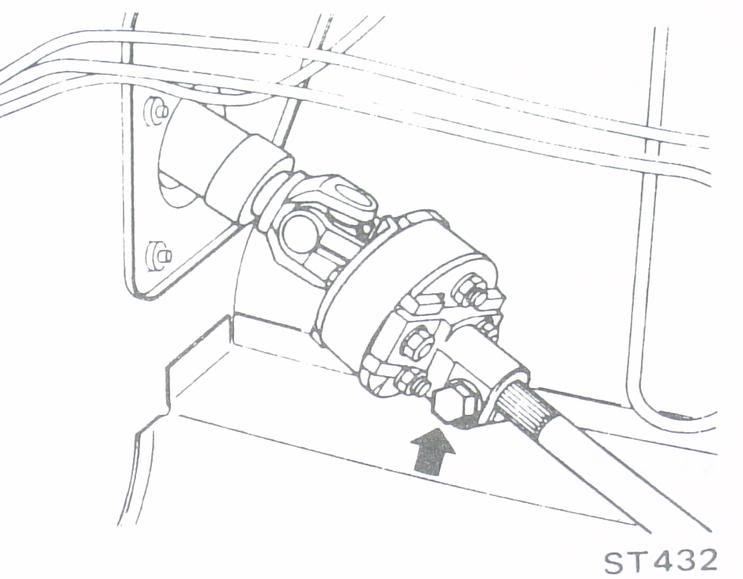
It’s held together by four bolts, and the coupler is made of rubber. This is to dampen some of the deflection coming up through the steering wheel when the front wheels encounter a bump or a ridge in the road, and it’s no longer needed.
Loosen all the nuts first – you’ll have to rotate the shaft to get access to the lower ones. Then take the bolts out one at a time. Remove the coupler and all the plates. Now, all you should have left on the end of the column poking out of the firewall is a small fork with two holes – you’re almost there!
8) Remember the bolts we loosened in Step 5? It’s time to remove those completely, set them aside, and fish the steering column out of the car. You may need your helper to guide the fork through the hole in the firewall.
Column out? Nice work! Set it aside so you can return it for your core credit. Now, let’s get to the fun part.
NOTE: We’ve made some updates and improvements to the kit since our early units. So, follow along with the steps here: Early Z column modifications When you’re done, you can return here and pick up at Step 9!
9) Place the new column in the car, and feed the end through the firewall – Again, that helper will come in handy, especially if you don’t want to lay on the floor!
10) Take the bolts you removed in Step 5 and replace them loosely, so the column will hang under the dash. Do the same with the firewall bolts we removed in Step 6. We’ll tighten all of these later – For now, we just want them back in their original location so we can work on other things.
11) Assemble the shafts connecting the upper column to the lower splines (at the rack). You may need to wiggle / rotate the steering shaft slightly.
12) Rotate the motor on the column so that it is tucked up nicely. This will vary, depending on your Z. It can go to the right or left – For most installations, rotating it up to the left (above your left knee) is ideal. Once you get it where you want it, have your assistant hold it in that position, and tighten the bolts we left loose in Step 10.
NOTE: On some Z cars, the metal brace that holds the pedal assembly is longer than others – No rhyme or reason to it, it’s just another of those weird things Datsun did back in the day before quality control was a big deal. This is uncommon, but we have seen it on a few Z cars. In the unlikely case that it interferes with the motor tucking up nicely, you may have to lop off a small chunk of it. This can be accomplished with a hacksaw, an angle grinder, or a cut-off wheel. I used a metal wheel on an angle grinder – cover your footwell with a tarp or a rubber mat to protect your carpet and vinyl from sparks.
13) Now, we can hook up the “brain box.” The plugs are self-explanatory, as they only go in one way. The box should be mounted to the firewall, away from the pedals, and MUST be mounted directly to the metal of the firewall. You can get fancy with this part of the install, or you can run a self-tapping screw through the hole and call it done – it’s your call. DON’T get tempted to mount it to the underside of the cowl – punching holes in this area will result in water entering the footwells! The large power wire goes straight to the battery and your small power wire goes to a source that is “hot” with the ignition on, also known as a switched 12-volt source. Use a test light or volt meter to confirm that there is 12 volts on this wire when the key is in the On position.
14) Decide where you want your potentiometer – This is the controller with the dial, and it will allow you to control the amount of assist you get from the power steering. Some people want it easily accessible, some people set it and forget it. That’s your choice. I mounted mine in the cigarette lighter hole – Easy to reach, and it looks factory. Other customers have mounted it on the side of the console, yet another mounted it where the hazard switch goes, and one extended the wires and mounted it in the glove box. We leave it up to you – this isn’t critical, as we find most customers set it at 25% – 50% and leave it.
15) For Steps 1 through 4, reassembly is basically the reverse of removal. When replacing your ignition switch, you can leave out the smooth-head screws from Step 4. Or, you can run to the hardware store and find two more that match. They’re not necessary. This is also a great time to clean up your switches, give them a fresh squirt of lubrication, and put a little anti-seize or light grease on the steering column splines before reinstalling the wheel.
16) Reconnect your battery terminal, latch the hood, and start up your Z. Turn the potentiometer all the way DOWN (counter-clockwise) and turn the steering wheel. You’ll find that you can actually turn the wheels lock-to-lock with the car sitting still. Go ahead and take it for a drive, preferably on a route with some tight turns, and adjust your assist to a comfortable level. Typically, people leave it at 25% to 50% for best results.
NOTE: If you encounter an issue, DO NOT start taking things apart. I hate to have to say this, but we have had a few customers try to modify or diagnose the system themselves. We WILL NOT warranty your system if you tamper with it. You may be an ASE-Certified technician, but the rules still apply. Contact us if you have an issue.
We hope you found this installation tutorial easy to follow, and we wish you years and years of safe, enjoyable motoring in your Z.